A landing page refers to a page on your website specifically designed to convert visitors to leads or customers. In fact, companies that use 10 to 15 landing pages increase their leads by 55%.
There are various ways to use a landing page, such as displaying product details and including a newsletter signup form. Whatever purpose it should serve, WordPress can help you create an attractive landing page in no time.
This article will show you how to make a landing page with WordPress, including picking a WordPress hosting provider, building a landing page, and publishing it.
1. Choose Your WordPress Hosting Provider
Picking the right web host is essential as it can determine your website’s speed, performance, and whether it can handle high traffic.
Therefore, make sure that the provider is secure, fast, and optimized for WordPress. Some features that help start and optimize your WordPress website include one-click WordPress installation, SSD storage, and customer support.
2. Install WordPress
If you choose a hosting provider that offers one-click installation, this step may only take several minutes.
Just go to its control panel, search for an auto or one-click installer, and choose WordPress. Then, fill out a form containing your domain name, email address, and password.
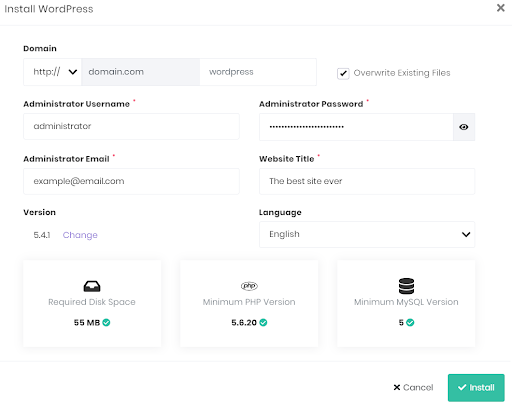
After that, you should see a link that directs you to your WordPress dashboard.
3. Build and Customize Your Landing Page
There are two most convenient methods to create a landing page: a website builder or a landing page builder.
A website builder is a tool helping you build a website, including a landing page, without manual code. One of the best website builders is Elementor. Another option is to use a landing page builder plugin, like SeedProd.
Both plugins offer free and premium versions and a drag-and-drop editor with various widgets to help design a landing page you want. They include an image carousel, basic gallery, and star ratings.
Moreover, Elementor and SeedProd provide many responsive landing page templates. So you can be sure that your page can look and function well on various devices.
To install a plugin, click Plugins on the WordPress main navigation -> Add New. Search for the name of the plugin, and then click Install -> Activate.

Now, let’s see how to use each plugin to create a landing page.
Method 1: Using a Website Builder Plugin
After activating the Elementor plugin, you should see a new menu tab in the main navigation named Templates. Click Templates -> Landing Pages -> Add New Landing Page to start creating your landing page.
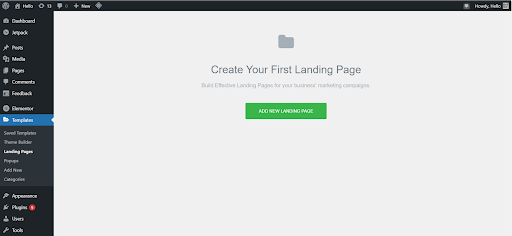
There are free and premium templates. If you’re on a tight budget, the free ones can be a great option. Search for a template you like, then click Insert. It will direct you to the Elementor’s Template Library that requires you to sign up using your email address.

After that, you should view the customization page with several tabs on the left-side menu:
- Layout. Change the content width, height, and column position.
- Style. Edit the background and typography.
- Advanced. Add motion effects and custom CSS.
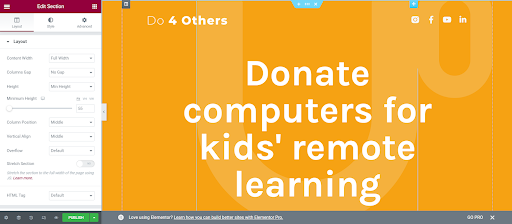
To customize the elements, click any block and edit it using the settings on the left menu. It’s also possible to move elements by dragging and dropping them in the preferred section.
Method 2: Using a Landing Page Builder Plugin
On the welcome page, hit the Create Your First Page button to start building your landing page.
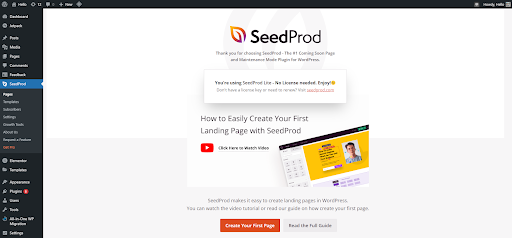
You’ll have several options, like a “coming soon” or “maintenance mode” page. If the options don’t suit your needs, click Create New Landing Page. You can start customizing with a blank page or pre-made template.
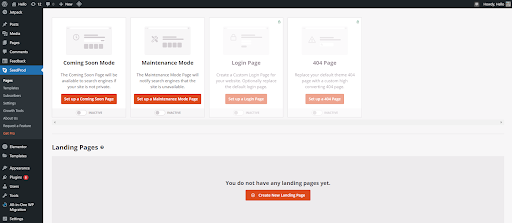
Preview the template by clicking the zoom icon. Then, press Choose This Template on the right corner and enter the page name to start editing the template.

Click any section to edit the background style, spacing, and border. Then, click any element you want to edit and adjust its settings on the left-hand menu.

Hit the mobile icon to preview your landing page on a mobile device.
It’s also possible to add a new feature by clicking the nine-dot icon at the top right of the settings menu. Here you can add blocks, like a contact form and video.
4. Optimize for Search Engines
One way to optimize your landing page is to add relevant keywords in its elements, such as:
- Headings, including the headline and tagline
- Copies and testimonials
- Alt texts in images and videos
- Meta description
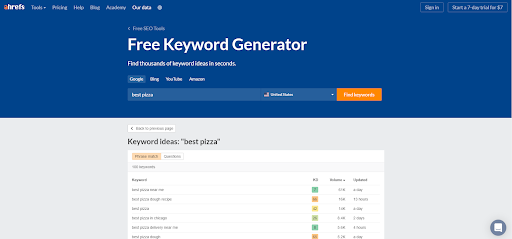
A keyword tool like Ahref’s Keywords Generator can help find keyword ideas. To use this tool, visit the site and enter a keyword phrase. It will show you related phrases and important metrics, like search volume and keyword difficulty.
5. Publish the Landing Page
Before publishing your landing page, ensure that it’s attractive, informative, responsive, and well optimized for search engines.
Once you’re confident with your landing page, click the Publish button. In Elementor, it’s located at the bottom of the settings menu.

Meanwhile, in SeedProd, press the Publish button on the top-right corner.

Conclusion
A landing page is a valuable tool for turning leads into sales. It can encourage visitors to take action, like signing up for a newsletter and purchasing a product.
To summarize, here are five steps you can take to build a landing page in WordPress:
- Pick the best WordPress hosting provider.
- Install WordPress.
- Build a landing page using a website builder or landing page builder plugin.
- Optimize the landing page for search engines.
- Launch your landing page.
Once you complete the steps above, you’re ready to have an appealing landing page and convert your visitors to leads. Good luck!
